
The One Inch Rule for Perfect Drip Edge Installation
Drip edge overlap is one of the most critical — and most commonly botched — details in residential roofing. Get it wrong, and you’re looking at rotted fascia boards, voided shingle warranties, and water damage that can cost over $1,600 to fix. For homeowners seeking reliable roofing services in Alabaster, understanding these technical requirements is the first step toward a durable home exterior. In the humid, storm-prone climate of Central Alabama, the perimeter of your roof acts as the first line of defense against the elements. When that defense is compromised by a mere inch of missing metal, the structural integrity of your entire home is at risk.
Quick answer: How much should drip edge sections overlap?
| Location | Minimum Overlap (IRC) | Minimum Overlap (Florida/High-Wind) |
|---|---|---|
| Eaves | 2 inches | 3 inches |
| Rake edges | 2 inches | 3 inches |
Other key requirements at a glance:
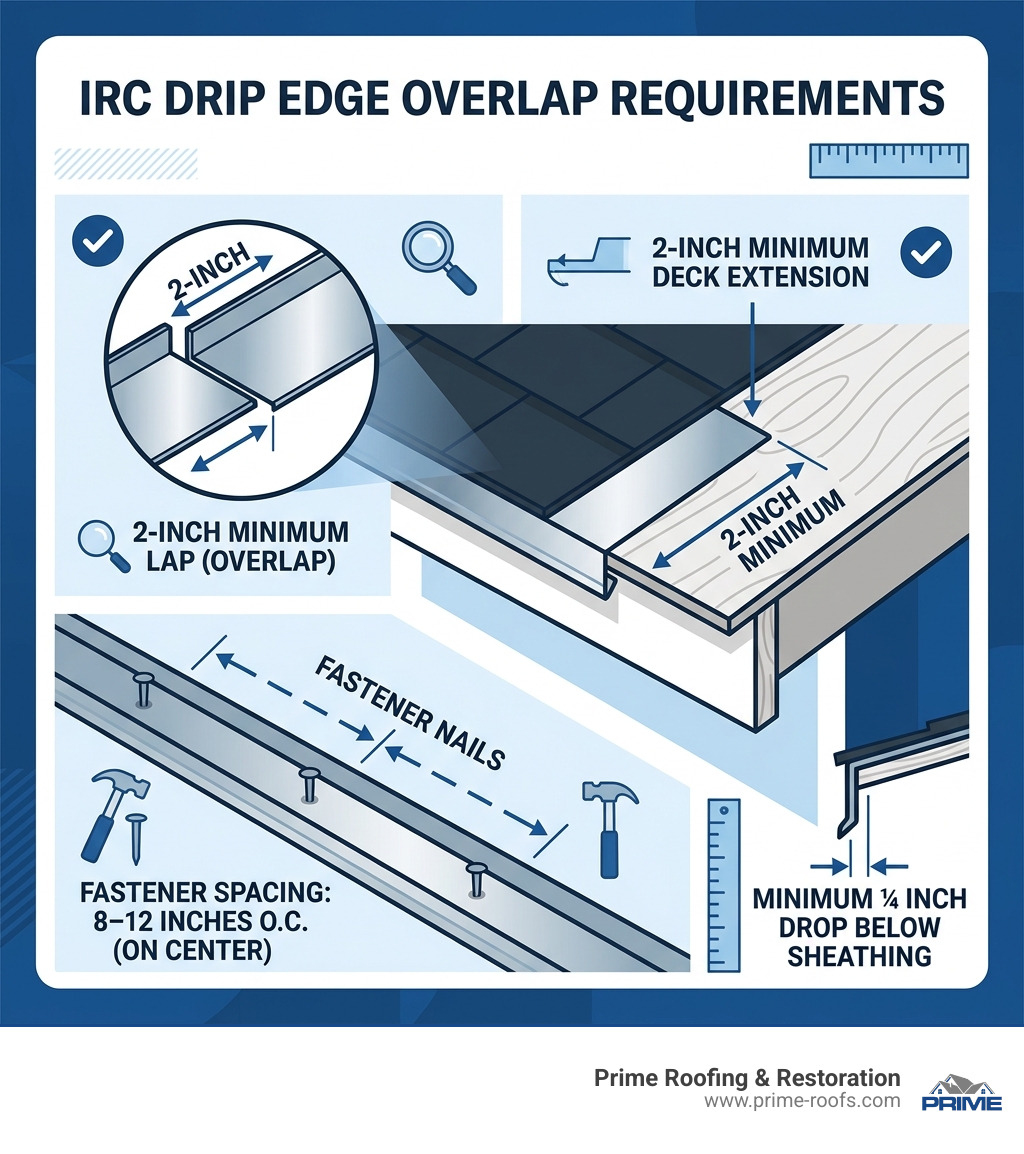
- Drip edge must extend at least 2 inches back onto the roof deck
- Must drop at least 1/4 inch below the roof sheathing
- Minimum metal thickness: 0.019 inches (26-gauge aluminum equivalent)
- Fasten with roofing nails every 8-12 inches on center
- Material must be corrosion-resistant (galvanized, aluminum, or copper)
The International Residential Code (IRC) has required drip edge on all shingle roofs since 2012. Yet undersized, improperly overlapped drip edge remains the most common roofing mistake seen in the field — often because roofing supply shops still stock non-compliant 1.5-inch product that falls short of the 2-inch minimum deck extension. This “budget” metal might save a contractor a few dollars per house, but it leaves the homeowner vulnerable to long-term moisture infiltration.
I’m Bill Spencer, Owner and President of Prime Roofing & Restoration, and after completing hundreds of residential roof installations across Central Alabama and the Gulf Coast, improper drip edge overlap is one of the most consistent code violations I see on roofs that were installed by less experienced contractors. In this guide, I’ll walk you through exactly how to get it right, why the physics of water shedding demands these specific measurements, and how to ensure your roof meets the stringent 2026 building standards.
Drip edge overlap terms made easy:
Understanding Drip Edge Overlap and Its Role in Roof Protection
As of April 2026, the roofing industry has reached a consensus: the perimeter of your roof is its most vulnerable point. Without a properly installed drip edge, water doesn’t just fall off the roof; it clings to the edge through a process called capillary action and wicks backward into your wooden fascia boards and roof deck. This phenomenon, often referred to as the “Coanda Effect,” describes the tendency of a fluid jet to stay attached to a convex surface. In roofing, this means water wants to wrap around the edge of your shingles and run down your siding or behind your gutters.
Primary Purpose of Perimeter Flashing
The primary job of a drip edge is moisture control. It acts as a bridge between the roof surface and the gutter system. By providing a metal “lip” that extends outward, it forces water to break its surface tension and drop cleanly into the gutter. Beyond water diversion, it serves as a structural reinforcement for the shingles, preventing them from sagging over time. It also acts as a vital pest deterrent, sealing the small gap between the fascia board and the roof deck where squirrels, bats, and wasps love to nest. In Alabaster, where summer storms can dump inches of rain in minutes, this metal barrier is the only thing standing between a dry attic and a costly restoration project.
Why Overlap is Essential for Longevity
A roof is not a static object; it breathes, expands, and contracts with the Alabama heat. Drip edge overlap is essential because it creates a continuous, unbroken seal along the entire perimeter. If you simply butt two pieces of metal together, thermal expansion will eventually create a gap. During a heavy downpour or wind-driven rain event, water will find that gap and begin rotting the wood underneath.
By ensuring a minimum 2-inch drip edge overlap, you create a “shingled” effect that directs water over the joint rather than through it. This tiny detail is what prevents fascia rot and protects the structural integrity of your home’s rafter tails. Furthermore, proper overlap ensures that the metal remains rigid. When sections are not overlapped, they can vibrate or “chatter” during high winds, which eventually loosens the roofing nails and creates entry points for moisture. For more complex projects, you can learn about installing drip edge on sheds to see how these principles apply to all structures, regardless of size.
Building Code Requirements for Drip Edge Overlap in 2026
In 2026, building inspectors in Hoover and Alabaster are stricter than ever regarding the International Residential Code (IRC) standards. Ignorance of these codes is a leading cause of failed home inspections during sales. The code is designed to ensure that every component of the roof assembly works in harmony to shed water and resist wind uplift.
International Residential Code (IRC) Specifications
Per IRC R905.2.8.5, the requirements for drip edge on asphalt shingle roofs are definitive and non-negotiable:
- Deck Extension: The horizontal flange must extend at least 2 inches back onto the roof deck. This provides enough surface area for the metal to be securely fastened and for the underlayment to provide a proper seal.
- Overlap: Adjacent sections of drip edge must be lapped by a minimum of 2 inches. This ensures that water flowing along the edge cannot find a seam to penetrate.
- Vertical Drop: The edge must extend at least 1/4 inch below the roof sheathing. This “kick-out” ensures water clears the wood and falls into the gutter.
- Material Thickness: The metal must have a minimum thickness of 0.019 inches. This is roughly equivalent to 26-gauge aluminum or 28-gauge galvanized steel. Thinner “utility” grade metals are prone to bending and corrosion.
These aren’t just suggestions; they are the law. Many “budget” contractors still use 1.5-inch drip edge because it is cheaper and easier to find at big-box stores, but this fails the 2-inch deck extension requirement and can lead to a denied roofing warranty. If a manufacturer like GAF or CertainTeed inspects a failed roof and finds non-compliant flashing, they are legally entitled to void the material warranty.
Regional Variations and Severe Weather Standards
In Alabama, we have to account for high-velocity winds and tropical depressions. While the IRC mandates a 2-inch drip edge overlap, regional standards like the Florida Building Code—which many Gulf Coast-adjacent areas in Alabama adopt as a best practice—require a 3-inch lap. This extra inch provides a critical buffer against wind-driven rain that can be pushed uphill under the metal during a tropical storm or severe thunderstorm. If you are looking for roofers near Alabaster, AL, ensure they are familiar with these local wind-load requirements. At Prime Roofing & Restoration, we default to the 3-inch standard for all our installations to provide our clients with maximum peace of mind.
Step-by-Step Guide to Achieving Proper Drip Edge Overlap
Installing a drip edge is a sequential process that requires precision. If you install the pieces in the wrong order, the drip edge overlap will actually trap water instead of shedding it. This is known as “reverse lapping,” and it is one of the most common causes of premature roof failure.
Mastering the Drip Edge Overlap at Eaves and Rakes
The golden rule of roofing is to always work from the bottom up, following the natural flow of gravity.
- Install at Eaves First: Place the drip edge directly onto the roof deck, underneath the underlayment (felt paper or synthetic). This ensures that if any water gets under the shingles, it flows over the underlayment, over the drip edge, and into the gutter. Secure the metal with roofing nails every 10 inches.
- The Overlap: When starting a new 10-foot section, overlap the previous piece by at least 2 inches. We recommend a 3-inch lap for better safety. Apply a small bead of roofing cement between the overlapping metal layers for an airtight seal in high-wind zones.
- Install Underlayment: Once the eaves are finished, roll out your underlayment. The underlayment should lay over the eave drip edge flange.
- Install at Rake Edges: On the gables (the slanted sides), the drip edge goes over the underlayment. This prevents wind-driven rain from blowing under the edge of the paper.
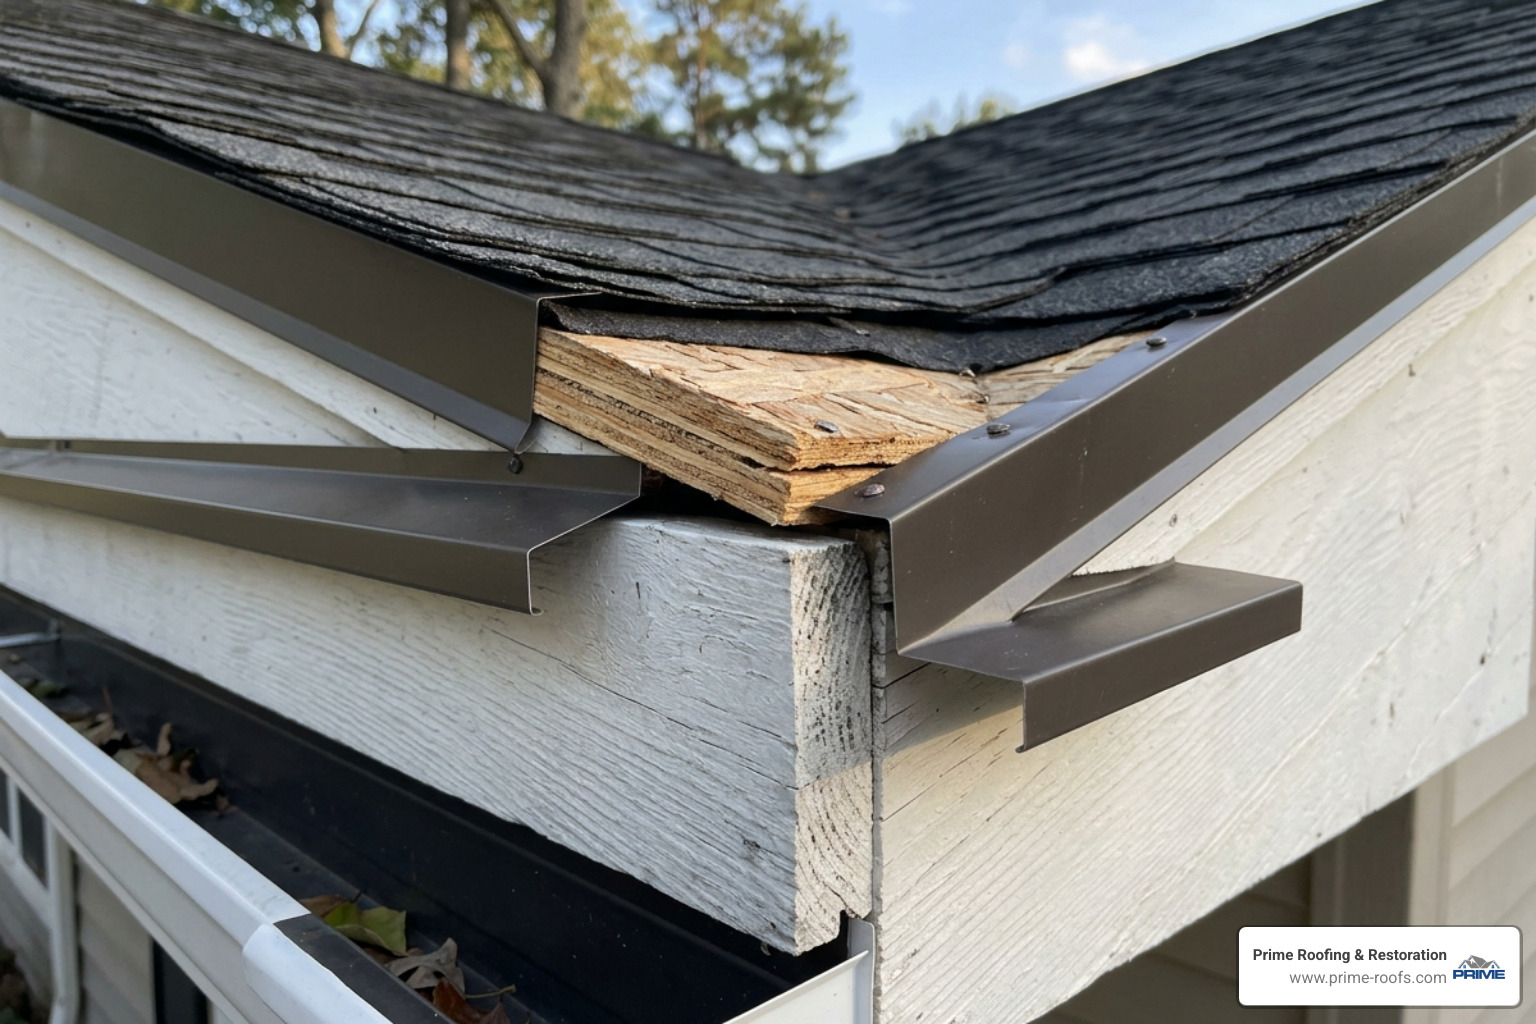
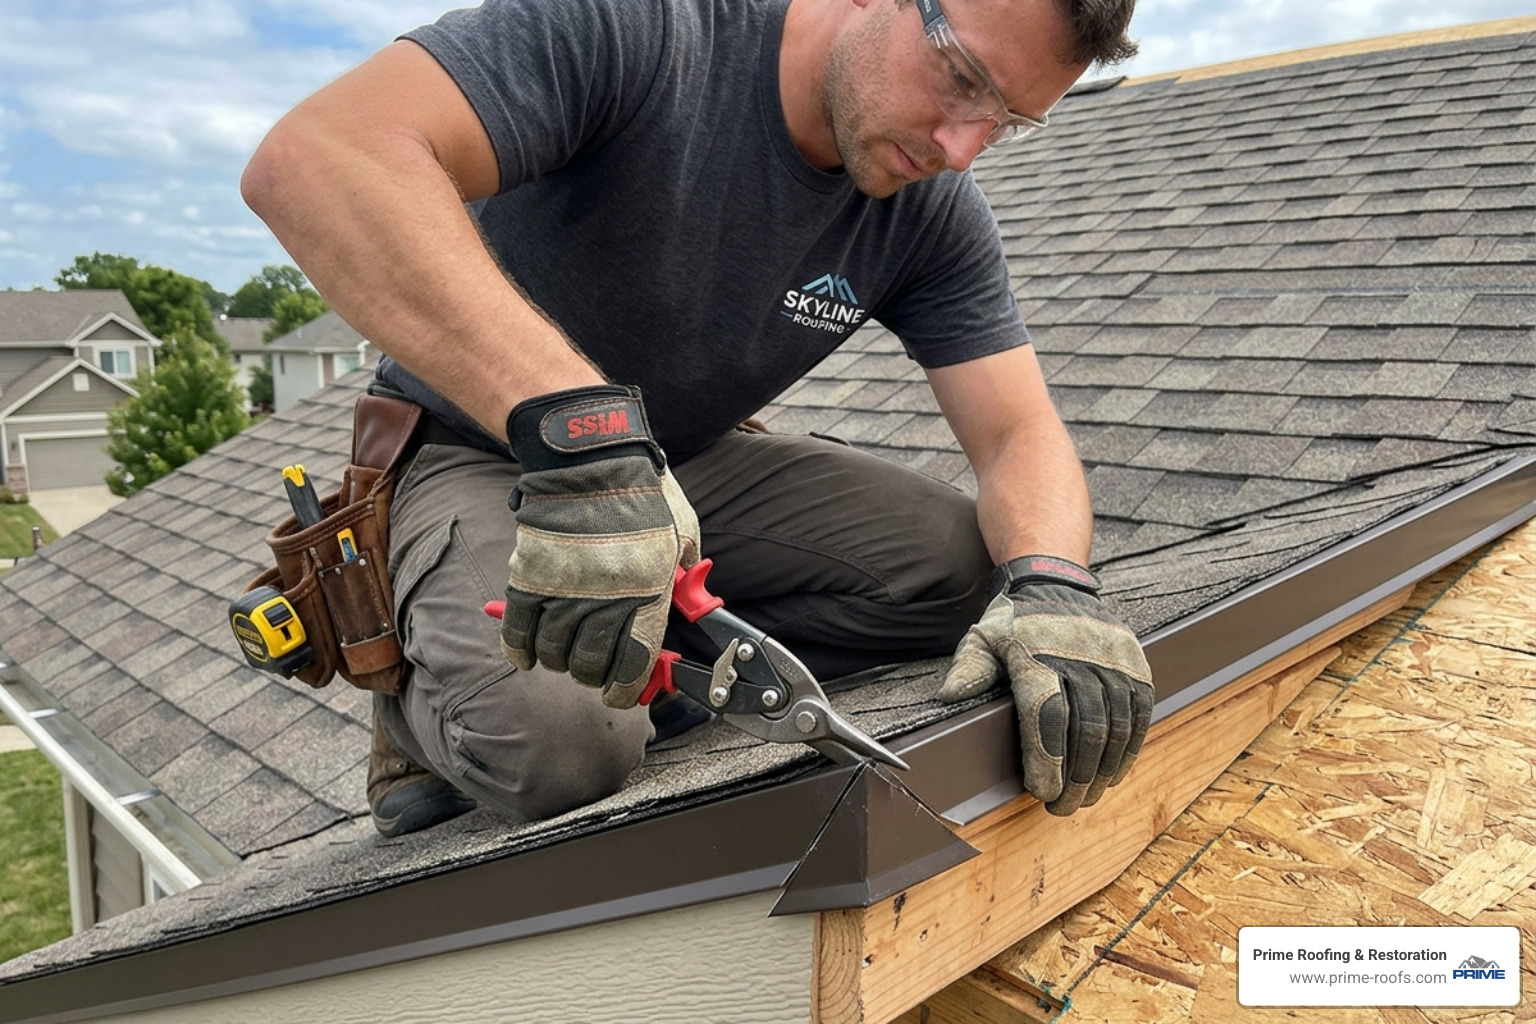
- Corner Transitions: At the corners where the eave meets the rake, the rake drip edge should overlap the eave drip edge. Cut the rake piece at a 45-degree angle and fold it over the eave piece for a clean, watertight finish. This “box-cut” method is the hallmark of a professional installer.
For more help with perimeter details, see our guide on repairing kickout flashing and edge leaks.
Common Mistakes in Drip Edge Overlap Installation
- The 1.5-inch Fail: Using the common 1.5″ x 1.5″ metal. It doesn’t reach far enough up the deck to meet code and provides insufficient surface area for the starter shingle to bond.
- Hand-Notching Errors: When contractors cut the metal to turn a corner, they often leave “fish-mouths” or gaps. Using pre-notched or snap-lock drip edge prevents this, but a skilled roofer with high-quality tin snips can achieve a perfect fit manually.
- Over-Nailing: Nailing too tightly can cause the metal to buckle as it heats up. Nails should be spaced 8-10 inches apart but allowed a tiny bit of “wiggle room” for thermal expansion. If the metal buckles, it creates a “wave” that lifts the shingles.
- Reverse Lapping: Overlapping the lower piece over the upper piece on a rake edge. This creates a “lip” that catches water and directs it under the metal. Always lap the upper piece over the lower one so water flows over the joint.
Materials and Components: Beyond the Overlap
Choosing the right material is just as important as the drip edge overlap itself. In Alabama’s humid climate, corrosion resistance is non-negotiable. Salt air from the Gulf can travel surprisingly far inland, and the high humidity in Alabaster accelerates the oxidation of cheap metals.
| Material | Durability | Best For | Pros/Cons |
|---|---|---|---|
| Aluminum | High | Most Residential | Won’t rust; easy to form; 0.019″ standard. Available in many colors. |
| Galvanized Steel | Very High | High-Wind Areas | Stronger than aluminum; can rust if coating is scratched. Requires 28-gauge minimum. |
| Copper | Lifetime | Luxury/Historic | Beautiful patina; extremely expensive; requires expert soldering. |
| Stainless Steel | Extreme | Coastal Homes | Virtually indestructible; very difficult to work with; highest cost. |
Integrating Ice and Water Shield
In 2026, we highly recommend the “sandwich technique” for eaves. This involves installing a layer of ice and water shield (a self-adhering membrane) under the drip edge, and then another strip over the top of the metal flange. This creates a redundant waterproof seal that is virtually impossible for ice dams or wind-driven rain to penetrate. In Alabaster, while we don’t get much ice, this technique is incredibly effective against “back-flow” during torrential downpours. This is especially important near roof penetrations; check our chimney flashing and edge repair guide for more on integrated waterproofing.
Starter Shingles and Final Alignment
The drip edge is only half the battle. Your starter shingles must be aligned correctly over the metal to ensure the entire system functions as intended.
- Overhang: Starter shingles should extend 1/3 to 3/4 inch past the drip edge. This creates a “drip line” that ensures water falls vertically into the gutter.
- Why?: If the shingles are flush with the metal, water can “wick” around the edge and rot the fascia. If they extend more than 3/4 inch, they will eventually sag and crack because they lack the support of the metal underneath.
- Fastening: Secure the drip edge with roofing nails spaced 8-10 inches on center. Never nail into the vertical face of the drip edge; only nail into the horizontal flange on the roof deck. Nailing the face prevents the metal from expanding and will cause unsightly ripples.
Consequences of Improper Installation and Maintenance
If you ignore the 2-inch drip edge overlap rule, the consequences aren’t immediate, but they are inevitable. Water damage is a slow-motion disaster that often goes unnoticed until the structural damage is significant. By the time you see a leak inside your home, the wood rot has likely been progressing for years.
Identifying Signs of Failure
Water is patient. If your drip edge is improperly overlapped or missing entirely, you will eventually see:
- Water Stains: Dark streaks on your fascia boards or the undersides of your soffits. This is a sign that water is wicking behind the metal.
- Gutter Sagging: When the wood behind the gutter rots, the spikes or brackets lose their grip, causing the gutter to pull away. This creates a vicious cycle where more water gets behind the gutter, accelerating the rot.
- Foundation Damage: Water that bypasses the drip edge often falls behind the gutter, saturating the ground next to your foundation instead of being carried away. This can lead to basement leaks and foundation settling.
- Warranty Issues: Most major shingle manufacturers, including GAF and CertainTeed, require code-compliant drip edge installation. If your roof leaks and they find a 1-inch overlap or undersized metal, they may deny your warranty claim.
- Pest Infiltration: A gap in the drip edge is an open invitation for squirrels and mice. Once they find a soft spot in the rotted fascia, they will chew their way into your attic.
Maintenance and Professional Inspection
We recommend an annual “perimeter check.” Use a ladder to safely inspect the joints between drip edge sections. Look for gaps that may have opened due to thermal expansion or loose nails. If you see metal that is rusted through or “fish-mouthing” at the corners, it’s time to call in a professional. A simple repair now, such as adding a piece of flashing or re-securing a loose section, can prevent a full roof replacement later. For homeowners in Alabaster, this inspection is best done in late spring after the heavy pollen season and before the peak of hurricane season.
Frequently Asked Questions about Drip Edge Overlap
What is the minimum overlap for drip edge sections?
According to the IRC, adjacent drip edge sections must overlap by a minimum of 2 inches. In high-wind areas or specific jurisdictions like Florida, this requirement increases to 3 inches to ensure a watertight seal against wind-driven rain. At Prime Roofing & Restoration, we treat 3 inches as our standard for all Alabama homes to provide that extra layer of security against our unpredictable weather patterns.
Should ice and water shield go over or under the drip edge?
For maximum protection, professionals recommend a “sandwich” approach: install the waterproofing membrane under the drip edge at the eave to protect the wood deck, then apply a starter strip of ice and water shield over the top of the drip edge flange. This ensures that any water backing up under the shingles is directed back onto the metal surface and into the gutter.
How far should starter shingles extend over the drip edge?
Starter shingles should extend between 1/3 inch and 3/4 inch past the drip edge. This ensures water clears the metal edge and drops directly into the gutter without wicking back toward the fascia. If the shingles extend too far (more than 1 inch), they lack support and will eventually break off due to gravity and wind.
Can I install drip edge over old drip edge?
No. This is a common shortcut that leads to failure. The old drip edge should be removed so the roof deck can be inspected for rot. Installing new metal over old metal creates a thick, uneven edge that prevents shingles from laying flat and creates gaps where water can enter.
What color drip edge should I choose?
Most homeowners choose a color that matches their fascia or gutter system to make the metal “disappear.” However, matching the shingle color is also a popular choice. Aluminum drip edge comes pre-painted in a wide variety of colors, including white, brown, black, and charcoal.
Is drip edge required by law in Alabama?
Yes. The Alabama Residential Building Code, which is based on the IRC, requires drip edge on all new shingle roof installations. Failure to install it can result in a failed building inspection and potential issues with your homeowner’s insurance policy.
How much does it cost to replace drip edge?
When done as part of a full roof replacement, the cost is relatively low, usually a few dollars per linear foot. However, replacing drip edge on an existing roof is much more expensive because the bottom rows of shingles must be carefully lifted or removed, which can lead to shingle damage.
Conclusion: Protecting Your Home with Proper Drip Edge Overlap
At Prime Roofing & Restoration, we believe that a roof is only as good as its weakest point. In many cases, that weak point is a missing or poorly installed drip edge overlap. As Alabaster’s roofing experts, we don’t cut corners — we overlap them. Whether we are helping you with insurance claims assistance or a full exterior restoration, our licensed experts use only quality materials that meet or exceed 2026 building codes. We understand that your home is your most significant investment, and we treat every perimeter detail with the precision it deserves.
We pride ourselves on building lasting relationships with our neighbors in Hoover, Alabaster, and throughout Alabama. We offer 24/7 service because we know that roofing emergencies don’t wait for business hours. If you suspect your roof’s perimeter flashing is failing or was installed without the proper drip edge overlap, do not wait for the next storm to find out.
Contact Information:
Prime Roofing & Restoration
1009 Guy St, Alabaster, AL 35007
Phone: (205) 335-2419
View our location on Google Maps
Contact the licensed experts at Prime Roofing & Restoration today for a comprehensive inspection and professional restoration. Let us protect your home and your family with the quality craftsmanship you deserve. Contact us for a professional roof inspection today.