
Why Proper Asphalt Shingle Roof Installation Determines How Long Your Roof Lasts
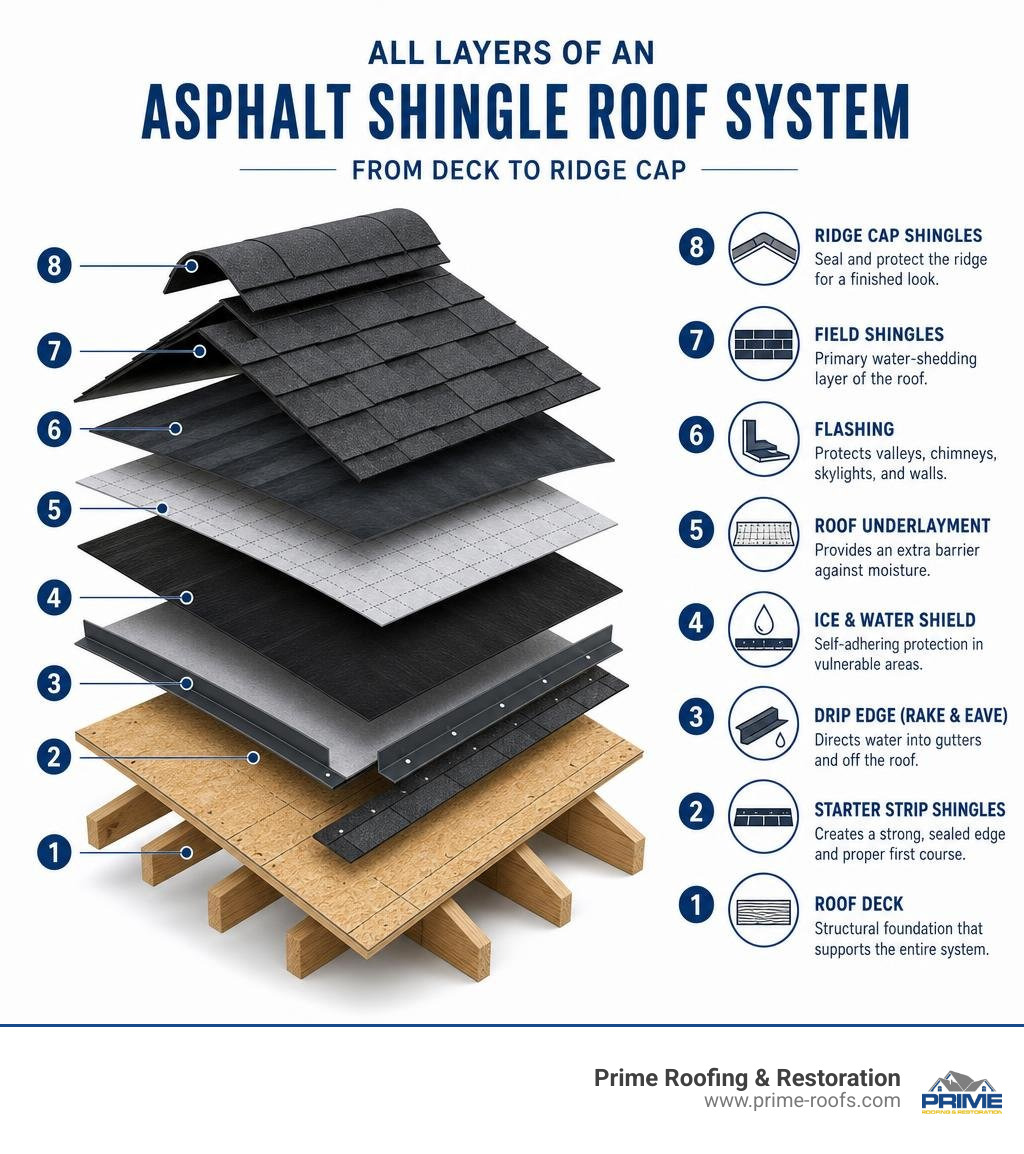
Asphalt shingle roof installation is the process of layering shingles, underlayment, flashing, and ventilation components over a prepared roof deck to create a weatherproof system that sheds water and protects your home. Done correctly, it can last 25–50 years. Done wrong, it fails in under five.
Quick answer — the core steps of asphalt shingle roof installation:
- Prepare the deck — remove old shingles, inspect sheathing, sweep clean
- Install drip edge at eaves, then ice and water shield, then underlayment
- Add drip edge at rakes over the underlayment
- Nail starter strips at eave and rake edges with 1/4″–3/4″ overhang
- Lay field shingles bottom to top, 4 nails per shingle (6 in high-wind zones)
- Flash valleys, chimneys, and walls with step flashing and W-metal
- Cap hips and ridges with purpose-made ridge cap shingles
- Verify ventilation meets the 1/300 rule (1 sq ft of vent per 300 sq ft of ceiling)
Asphalt shingles dominate the U.S. residential roofing market — accounting for roughly 80% of all residential roofs. That popularity comes with a catch: they’re also the most frequently installed incorrectly. Research from roofing industry professionals suggests that 68% of premature shingle failures trace back to just three preventable errors — missing starter strips, improper nail placement, and inadequate valley protection.
This guide gives you the complete, step-by-step process to get it right the first time — whether you’re overseeing a contractor or tackling the work yourself. If you want expert guidance from the start, Prime Roofing & Restoration is here to help.
I’m Bill Spencer, Owner and President of Prime Roofing & Restoration, with hands-on experience leading hundreds of asphalt shingle roof installation projects across Central Alabama and the Gulf Coast. In this guide, I’ll walk you through every layer of the process — from safety and material calculations to flashing, ventilation, and cold-weather adjustments.
Discover more about asphalt shingle roof installation:
Pre-Installation: Safety, Permits, and Material Calculations
Before we drive a single nail, we have to lay the groundwork. A successful asphalt shingle roof installation relies on careful preparation. Skipping safety gear or miscalculating your materials will result in delays, budget overruns, or worse — a trip to the emergency room.
If you are planning a full replacement, checking a comprehensive homeowner’s guide to professional roofing services can help you understand the entire scope of the project.
Essential Safety Gear and Fall Protection
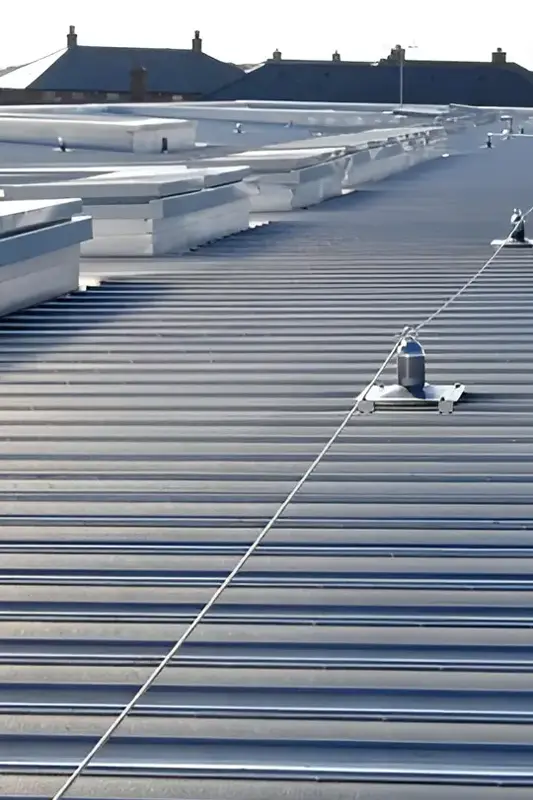
Roofing is inherently hazardous. According to OSHA standards, fall protection is mandatory for any work performed 6 feet or more above a lower level. We never step onto a roof without the proper safety gear.
- Safety Harness & Anchor: A full-body harness connected to a secure roof anchor via a shock-absorbing lanyard or self-retracting lifeline.
- Hard Hat: Essential during the tear-off phase to protect against falling debris and accidental impacts.
- Slip-Resistant Boots: High-traction footwear with rubber soles to prevent slips on steep pitches.
- Roof Brackets (Slide Guards): Temporary wooden planks secured to the roof deck to provide stable footholds on steeper slopes.
Additionally, before starting any structural work in Alabaster or Hoover, AL, make sure you secure the necessary approvals. Consult our local roofing permits guide to stay fully compliant with local building codes.
How to Measure and Calculate Roofing Materials
In the roofing industry, we measure roof area in “squares.” One roofing square equals 100 square feet of roof surface.
To determine how many squares your roof has, divide the total square footage by 100. For example, a 2,000-square-foot roof is exactly 20 squares.
- Shingles: Standard asphalt shingles are sold in bundles. It takes exactly three bundles of asphalt shingles to cover 100 sq. ft. (one square). Therefore, multiply your total squares by 3 to find your base bundle count.
- Overage and Waste: Always add a waste allowance. For a straightforward gable roof, add 10% overage. For complex roofs with multiple valleys, hips, and dormers, add 15% to 20% overage to account for cuts and starter courses.
- Ridge Caps: Measure the total length of all hips and ridges. Divide this length by 35 to determine the number of specialized ridge cap bundles required.
- Underlayment: Standard synthetic underlayment rolls cover roughly 10 squares. Always account for a 3-to-4-inch horizontal overlap between runs.
For more technical specifications on material requirements and professional tolerances, you can reference the official Roofing Installation Guide.
Step-by-Step Guide to Asphalt Shingle Roof Installation
Now that the materials are staged and your safety harness is anchored, it is time to begin the actual installation. Following a strict sequence ensures that gravity works with your roof, not against it.
Preparing the Roof Deck for Asphalt Shingle Roof Installation
A roof is only as good as the deck beneath it. Applying new shingles over an old, rotting deck is like building a brick house on quicksand.
- The Tear-Off: Use a heavy-duty roofing fork to pry up old shingles and underlayment, starting from the ridge and working down to the eaves. Lay heavy tarps over your landscaping and driveway to catch loose nails and debris.
- Nail Extraction: Go over the entire deck with a claw hammer or pry bar to pull out flat or rusted nails. Leftover nails will puncture your new underlayment and shingles.
- Inspect the Sheathing: Check the wood sheathing for signs of rot, water damage, or sagging. For residential roofs, the deck must consist of a minimum of 7/16-inch OSB or 1/2-inch plywood. Replace any damaged panels immediately to ensure a flat, structurally sound nailing surface.
- Sweep the Deck Clean: Use a stiff-bristle push broom to remove all sawdust, dirt, and loose granules. A clean deck ensures self-adhering membranes stick flawlessly.
Installing Drip Edge, Ice and Water Shield, and Underlayment
Moisture protection requires a layered defense system. We install these components from the bottom up to ensure water sheds naturally over each overlap.

- Eave Drip Edge: Install your metal drip edge flashing directly onto the bare wood deck along the eaves. Secure it with roofing nails spaced 12 inches apart. This prevents water from wicking backward into the fascia board.
- Ice and Water Shield: In areas prone to ice dams or heavy wind-driven rain, apply a self-adhering ice and water protector directly over the eave drip edge. This membrane must extend from the eave edge to a point at least 24 inches inside the interior wall line.
- Synthetic Underlayment: Roll out your synthetic underlayment horizontally across the deck, working from the bottom up. Overlap each row by at least 3 to 4 inches. Fasten it using plastic cap nails spaced according to the manufacturer’s wind-resistance guidelines.
- Rake Drip Edge: Unlike the eaves, the drip edge flashing along the rakes (the sloped outer edges of the roof) must be installed over the underlayment. This locks down the underlayment edges and prevents wind-driven rain from blowing underneath.
| Underlayment Feature | Synthetic Underlayment | Traditional #15 Felt |
|---|---|---|
| Material Composition | Woven Polypropylene / Polyethylene | Asphalt-Saturated Organic Paper |
| Tear Resistance | Extremely High (won’t rip in high winds) | Low (prone to tearing when walked on) |
| Moisture Absorption | Impervious to water (won’t wrinkle) | Absorbs moisture (can wrinkle and telegraph) |
| UV Exposure Limit | Up to 180 days | Typically degrades within days |
| Weight per Roll | Lightweight (approx. 20-30 lbs) | Heavy (approx. 45-60 lbs) |
Laying Starter Shingles and the First Course
The starter course is your roof’s first line of defense against high winds. Skipping this step is the single most common cause of eave blow-offs.
- Positioning: Align your starter strip shingle along the eaves and rakes. It should overhang the drip edge by 1/4 to 3/4 of an inch to guide water directly into your gutters.
- Securing: Nail the starter strips 3 to 4 inches up from the eave edge, spacing fasteners every 12 inches.
- Why It Works: Starter shingles feature a factory-applied sealant strip along their bottom edge. This adhesive bond locks down the tabs of your first course of field shingles, keeping them from lifting during severe storms.
Advanced Techniques: Nailing, Flashing, and Ventilation
Once your starter course is secure, you can begin laying your field shingles. However, speed should never compromise precision. To ensure your investment is fully protected, check our guide on the cost to replace roof shingles to understand how premium techniques impact long-term value.
Proper Nailing for a Successful Asphalt Shingle Roof Installation
Nailing errors are the leading cause of roof warranty denials. If you nail too high, you miss the double-coverage common bond area, leaving the shingles vulnerable to sliding off. If you nail too low, the fasteners remain exposed to the elements, creating immediate leak points.
- Fastener Type: Use 12-gauge hot-dipped galvanized roofing nails with a minimum 3/8-inch head diameter. Nails must be long enough to penetrate at least 3/4 of an inch into the wood deck or completely through the sheathing.
- Nail Quantity: Use a minimum of 4 nails per shingle under normal conditions. In high-wind areas or on slopes greater than 12:12, use 6 nails per shingle along with manual hand-sealing.
- Nailing Angle: Drive all nails straight and flush with the shingle surface. Never under-drive them (leaving the head sticking up) or over-drive them (cutting into the shingle mat with the nail head).
If you are dealing with an older roof showing signs of wear from poor nail placement, you may want to review our asphalt shingle repair complete guide to assess your repair options.
Flashing Valleys, Chimneys, and Vertical Walls
Water naturally concentrates in valleys and against vertical walls. These areas require robust flashing systems to redirect water away from joints.
- Valleys: We strongly recommend open metal valleys using W-profile metal flashing over closed-cut or woven valleys. Lay a 36-inch wide strip of self-adhering ice and water membrane down the valley center, place a minimum 28-gauge galvanized metal valley liner over it, and nail it only at the outer edges. Cut shingles back 2 inches from the valley centerline and secure them with roofing cement.
- Step Flashing: Where a sloped roof meets a vertical sidewall, install step flashing. Each L-shaped metal card must overlap the previous piece by at least 3 inches, running up the wall and under the siding to create an interleaved, watertight barrier.
- Chimneys: Install a metal apron flashing at the low side, step flashing along the sides, and a chimney saddle (or cricket) at the high side to divert water around the structure.
Meeting Attic Ventilation Requirements
Without proper ventilation, heat and moisture will build up in your attic, baking your shingles from the inside out and causing premature curling and cracking.
- The 1/300 Rule: Every roof space or attic above an insulated ceiling must be ventilated with openings providing an unobstructed vent area of not less than 1/300 of the insulated ceiling area. For example, if your attic floor is 1,500 square feet, you need at least 5 square feet of net free ventilating area.
- Balanced System: Split this ventilation evenly between intake vents (soffit or eave vents) and exhaust vents (ridge or gable vents). This creates a natural continuous airflow.
To learn more about how your roof’s slope affects ventilation options, check out our guide on understanding roof pitch.
Special Considerations: Cold Weather and Hip & Ridge Caps
Roofing doesn’t stop when the temperature drops, but cold weather requires distinct mechanical adjustments to prevent shingle damage.
Installing Hip and Ridge Cap Shingles
Ridge cap shingles shed water at the roof’s highest points and are highly exposed to wind uplift.
- Preparation: Use specialized, pre-cut hip and ridge cap shingles rather than bending standard 3-tab shingles, which can crack over time.
- Fastening: Use longer roofing nails (typically 1-3/4 inches) to ensure they penetrate through the multiple thick layers of shingles and into the wood decking.
- Direction: Install caps starting at the bottom of hips and working up, or from the end of the ridge opposite the prevailing wind direction to prevent wind from catching the edges.
Adjustments for Cold Weather Roofing
When temperatures drop below 40 degrees Fahrenheit, asphalt shingles become brittle and can easily crack when nailed or bent.
- Keep Shingles Warm: Store shingle bundles indoors in a heated space until right before they are nailed to the deck.
- Hand-Sealing: Shingles rely on solar heat to activate their thermal sealant strips. In cold weather, this adhesive will not bond automatically. Apply three 1-inch spots of approved asphalt plastic cement under the tab of each shingle to lock them down manually.
- Handle with Care: Avoid dropping or throwing shingle bundles, as frozen shingles can shatter.
Frequently Asked Questions about Asphalt Shingle Roof Installation
What is the minimum roof slope for asphalt shingles?
The minimum roof slope permitted for standard asphalt shingle application is 4:12. For lower slopes between 2:12 and 4:12, standard shingles may be installed only if you use a double layer of underlayment or a self-adhering membrane across the entire surface. Asphalt shingles should never be installed on slopes below 2:12.
How many bundles of shingles do I need per square?
It takes exactly three bundles of standard asphalt shingles to cover one square (100 square feet) of roof area. Always add a 10% to 20% waste factor to your total order to cover starter courses, hips, ridges, and cuts.
Why is a starter strip necessary?
A starter strip provides a continuous sealant line along the eaves and rakes. Without it, the first course of shingles has no adhesive backing to bond to, leaving the entire roof edge highly vulnerable to wind uplift and blow-offs during storms.
Conclusion
A successful asphalt shingle roof installation requires strict adherence to safety protocols, exact material calculations, and a layered, watertight system. From the initial tear-off to the final ridge cap, every step plays a vital role in protecting your home. Skipping even a minor detail — like a starter strip or a few nails — can cut your roof’s lifespan in half.
At Prime Roofing & Restoration, we are dedicated to providing the highest standards of craftsmanship across Alabaster, Hoover, and the surrounding Central Alabama communities. Whether you need a comprehensive roof replacement, minor repairs, or assistance with an insurance claim, our licensed and certified experts are here to help 24/7.
Are you ready to secure your home with a roof built to last? Visit our Alabaster office to schedule your free estimate. Let us help you nail it every time!