
Why Proper Owens Corning Ice and Water Shield Installation Protects Your Roof for Decades
Owens Corning ice and water shield installation is one of the most important steps in building a roof that holds up against ice dams, severe thunderstorms, and wind-driven rain. Homeowners looking to safeguard their properties can rely on the expert team at Prime Roofing & Restoration to deliver durable, weather-resistant roofing systems. If you have questions about your roof or need an inspection, call our team today at (205) 225-4673.
Here’s a quick overview of how to install it correctly:
- Prep the deck — Clean, dry, and structurally sound. Minimum slope of 2:12.
- Set the drip edge — Install drip edge under the membrane at eaves, over it at rakes.
- Cut and relax the membrane — Cut into 10–20 ft lengths. Let it relax 3–5 minutes before applying.
- Peel and press — Remove the release backer while pressing the membrane firmly into place.
- Overlap correctly — Minimum 3-inch side laps, 6-inch end laps. Hand-roll all seams.
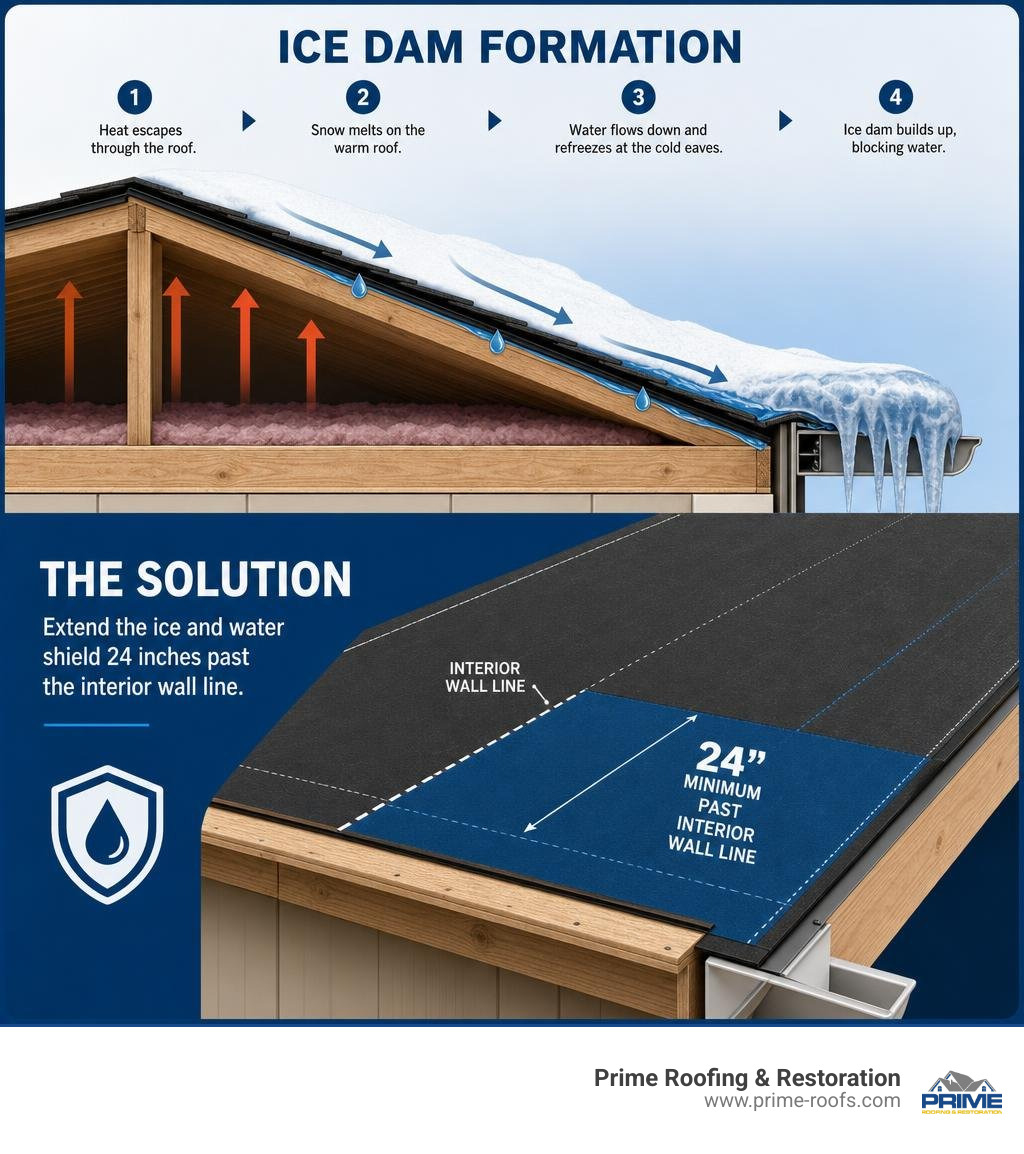
- Extend 24 inches past the interior wall line — This places the membrane well above typical ice dam buildup.
- Cover within 30 days — UV exposure beyond 30 days degrades performance.
The Threat of Water Damage in Central Alabama
While many homeowners associate ice and water shields strictly with freezing northern climates, they are equally critical in Central Alabama. Our region experiences intense seasonal weather, from severe spring thunderstorms and tropical storm remnants to sudden winter freezes.
Ice dams form when heat escapes through your roof, melts snow, and that water refreezes at the cold eaves. Without a proper self-adhered membrane underneath your shingles, that backed-up water finds its way under your roofing and into your home. In the summer, wind-driven rain from severe storms can force water upward under shingles. Without a self-sealing barrier, this water penetrates the roof deck, leading to slow, expensive structural rot, mold growth, and ruined ceilings.
Owens Corning’s WeatherLock product line — including WeatherLock Flex, WeatherLock G, and WeatherLock Mat — is specifically engineered to create a watertight, self-sealing barrier at the most vulnerable parts of your roof. As part of a professional roof installation, these products deliver reliable protection when installed correctly.
I’m Bill Spencer, Owner and President of Prime Roofing & Restoration, and I’ve overseen countless residential roofing projects across Central Alabama involving Owens Corning ice and water shield installation on everything from new builds to full storm-damage replacements. In this guide, I’ll walk you through every step so the job gets done right the first time.
Easy owens corning ice and water shield installation glossary:
Understanding Owens Corning WeatherLock Ice and Water Barriers
Owens Corning WeatherLock self-adhering underlayments are engineered modified bitumen membranes designed to seal around roofing fasteners. Unlike standard felt or synthetic underlayments, which only shed water and can leak if punctured, WeatherLock forms a continuous, watertight, and vapor-tight bond directly to the roof deck.
When a roofing nail penetrates the WeatherLock membrane, the rubberized asphalt compound tightly grips and seals around the shank of the nail. This self-sealing capability is certified under ASTM D1970, the industry standard for self-adhering polymer-modified bituminous sheets. This standard ensures the membrane remains flexible at low temperatures and maintains its watertight seal even under hydrostatic head pressure.
When choosing the right material for your roof, Owens Corning offers three primary variations in the WeatherLock family:
- WeatherLock Flex: A high-performance, poly-surfaced underlayment. It is highly flexible and elastic, making it incredibly easy to detail around complex roof shapes, valleys, chimneys, and skylights. Its cross-laminated poly surface provides excellent tear resistance.
- WeatherLock G (Granulated): Features a granulated asphalt surface that provides excellent slip resistance for installers. It is a rugged, cost-effective choice for standard eave and valley protection, offering a durable walking surface during installation.
- WeatherLock Mat: A mineral-surfaced underlayment that offers a balanced combination of durability, weight, and value, covering approximately 200 square feet per roll. It is lighter than granulated options but still provides reliable traction.
Using these specialized products is a key part of choosing high-quality roofing materials that secure your home’s long-term health. Below is a specification comparison to help you choose the right product for your project, based on the WeatherLock® Self-Sealing Ice & Water Barrier Installation Instructions.
| Feature | WeatherLock Flex | WeatherLock G | WeatherLock Mat |
|---|---|---|---|
| Surface Material | Smooth Poly / Elastic | Granulated | Mineral Mat |
| Roll Coverage | Approx. 200–225 sq. ft. | Approx. 200 sq. ft. | Approx. 200 sq. ft. |
| Best Used For | Complex details, valleys, cold weather | Standard eaves, valleys, high-traction | General eave and valley protection |
| Max UV Exposure | 30 Days | 30 Days | 30 Days |
| Self-Sealing | Yes | Yes | Yes |
| ASTM Standard | ASTM D1970 | ASTM D1970 | ASTM D1970 |
WeatherLock vs. Grace Ice & Water Shield
When analyzing performance, contractors often compare Owens Corning WeatherLock to Grace Ice & Water Shield. Both products utilize high-performance rubberized asphalt formulations to seal around nails. However, Grace underlayments are formulated to withstand extreme rooftop temperatures and provide performance for the life of the roof, with some variants rated for up to 120 days of exposure.
While Grace is an industry benchmark for high-temperature and extreme-exposure projects, WeatherLock is designed to integrate seamlessly into the Owens Corning Total Protection Roofing System, ensuring homeowners qualify for extended system warranties. When installed by an Owens Corning Preferred Contractor like Prime Roofing & Restoration, these components work together to provide maximum warranty coverage.
Pre-Installation Requirements: Slopes, Temperatures, and Deck Prep
Before starting your owens corning ice and water shield installation, the roof structure must meet specific slope, temperature, and cleanliness requirements to guarantee proper adhesion. Skipping these preparatory steps will compromise the adhesive bond, leading to wrinkles, bubbles, or premature failure.
Slope Requirements
WeatherLock products are designed for sloped residential roofs. They must be applied on roofs having slopes of 2″ rise minimum in 12″ run (2:12) or greater. For low-slope applications between 2:12 and 4:12, double-layering standard underlayment or using full-coverage self-adhered membranes is critical to prevent water backup. WeatherLock is not rated for flat roofs (slopes below 2:12); flat roofs require specialized low-slope roofing systems like TPO or modified bitumen torch-down systems.
Temperature and Weather Conditions
The ideal temperature window is vital for the self-adhesive backing to activate and bond securely to the wood deck.
- For best results, apply WeatherLock underlayment when the air, deck, and membrane temperatures are above 40°F (5°C) but below 100°F (38°C).
- If you must install below 40°F, the adhesive will not stick instantly. You will need to store the rolls in a warm space prior to installation, use an asphalt-based primer (such as ASTM D41 primer) on the deck, or use hand-nailing to temporarily secure the membrane until warmer weather permanently fuses the adhesive to the deck.
- Avoid installing in high winds or wet conditions. Moisture on the deck will completely prevent adhesion.
Deck Preparation
Applying self-adhered membranes over a poor surface will lead to premature failure, bubbles, or peeling.
- Remove Old Materials: Strip the roof down to the bare wood deck. Remove all old shingles, felt, staples, and fasteners. A clean deck is non-negotiable.
- Clean the Substrate: Sweep the deck completely clean of dust, dirt, pine needles, and wood fibers. The deck must be 100% dry; moisture trapped under the membrane will cause adhesion failure and wood rot.
- Inspect and Repair: Ensure the plywood or OSB sheathing is structurally sound, properly spaced, and securely nailed. Replace any warped, rotting, or damaged boards. Fill large gaps between panels to ensure a solid backing. Check for deck deflection or sagging that could collect water.
For a deeper look at structural preparation, consult our roof replacement complete guide or refer to the official Owens Corning Roofing Installation Guide.
Step-by-Step Owens Corning Ice and Water Shield Installation Guide
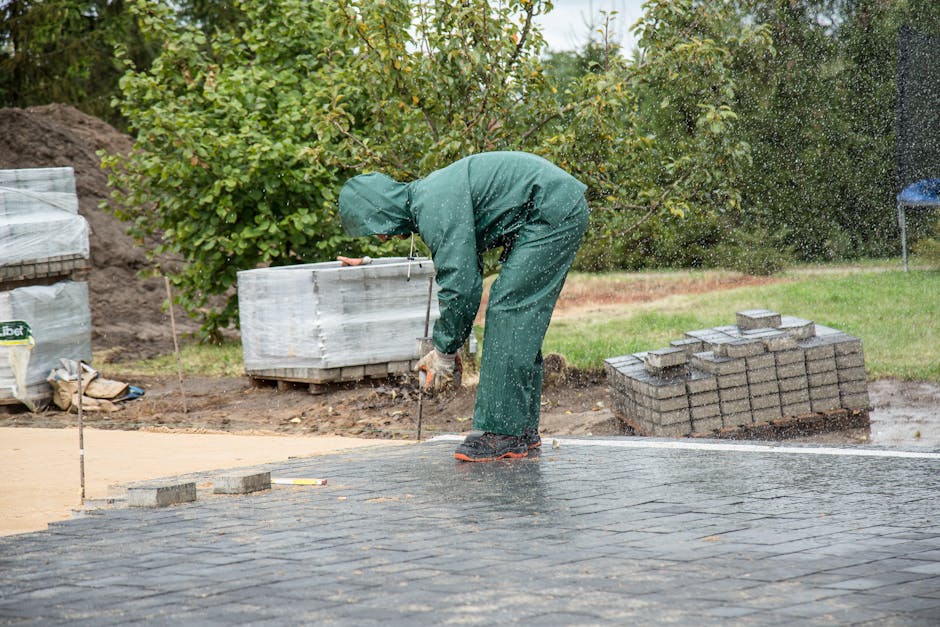
Installing self-adhered membranes requires patience, safety precautions, and the right tools. Because these membranes are highly sticky, mistakes can be difficult to correct once the adhesive touches the wood deck.
Required Tools and Safety Gear
- Utility knife with extra hook blades (hook blades cut cleanly without damaging the deck)
- Hand roller or weighted roller (essential for sealing laps and seams)
- Chalk line
- Hammer or cap nailer (for steep-slope back-nailing)
- OSHA-approved fall protection (harness, rope, and roof anchor)
Safety Warning: Self-adhered membranes and their release liners are extremely slippery, especially when wet or covered in morning frost. Always wear fall protection, keep the work area clear, and dispose of the slippery release liners immediately after peeling. Do not step on the release paper once it is removed.
Preparing the Eaves and Rakes for Owens Corning Ice and Water Shield Installation
To ensure water sheds off the roof without reaching the wood deck, you must coordinate the membrane installation with your metal drip edges.
Eaves (Bottom Edges)
At the eaves, the metal drip edge goes directly onto the wood deck first.
- Install the metal drip edge along the eave, securing it with roofing nails every 8 to 10 inches.
- Apply the WeatherLock membrane over the top of the drip edge. This ensures that if water backs up under the shingles, it runs over the membrane, over the drip edge, and safely into the gutters without contacting the wood fascia or deck.
Rakes (Side Slopes)
At the rakes, the order is reversed.
- Apply the WeatherLock membrane (or standard underlayment) directly to the wood deck first, extending it right to the edge of the roof.
- Install the metal drip edge over the top of the underlayment. This prevents wind-driven rain from blowing under the edge of the shingles and lifting the membrane.
The 24-Inch Rule for Ice Dam Protection
To provide adequate protection against ice dams, the membrane must extend from the eave edge to a point at least 24 inches inside the exterior wall line.
To calculate this accurately:
- Measure the horizontal width of your eave overhang (soffit).
- Add 24 inches to that horizontal measurement.
- Account for your roof slope to determine the actual diagonal width of the membrane needed on the slope.
Mathematical Example: If your eave overhang is 12 inches, you need 36 inches of horizontal coverage (12″ + 24″). On a 6:12 slope roof, 36 inches of horizontal run translates to approximately 40 inches of diagonal slope distance. Since a standard roll of WeatherLock is 36 inches wide, a single course will not meet the 24-inch rule. You must install a second course, overlapping the first by at least 3 inches, to achieve the required coverage.
Laying the Membrane: Step-by-Step Owens Corning Ice and Water Shield Installation
For standard applications, we recommend cutting the membrane into manageable 10-to-20-foot lengths. Working with a full 66-foot roll can lead to wrinkles, misalignments, and frustration.
- Cut and Relax: Cut the membrane into 10-to-20-foot sections. Unroll them on a flat surface and let them relax for 3 to 5 minutes to flatten out and release tension.
- Align and Chalk: Snap a chalk line along the lower roof edge to keep your line straight. Align the relaxed membrane piece along the eave, ensuring it extends slightly past the drip edge.
- The Split-Release Method:
- Fold the aligned membrane piece in half lengthwise (upslope).
- Carefully slit the release paper backing along the fold line using your utility knife (be careful not to cut through the membrane itself).
- Peel back the lower half of the release liner at a 45-degree angle while pressing the exposed adhesive firmly onto the deck.
- Once the lower half is secured, fold the upper half down, peel the remaining release liner, and press the upper portion into place.
- Hand-Roll the Surface: Use a hand roller or firm hand pressure to press the membrane from the center outward to eliminate air bubbles and ensure 100% contact with the deck. Pay special attention to the edges and seams.
For detailed instructions on elastic membrane handling, see the WeatherLock® Flex Ice & Water Barrier Installation Instructions.
Handling Overlaps, Valleys, and End Laps
Waterproofing seams is where many DIY projects fail. To maintain a continuous barrier, follow these strict overlap guidelines:
- Side Laps (Horizontal Overlaps): When running consecutive courses up the roof, overlap the upper course over the lower course by a minimum of 3 inches (use the printed ply lines on the membrane as a guide).
- End Laps (Vertical Overlaps): When joining two pieces end-to-end, overlap them by a minimum of 6 inches. Always hand-roll these seams for a watertight bond.
- Valleys: Valleys are high-volume water paths. Apply WeatherLock in valleys before installing underlayment on the eaves.
- Center a full, uncut 36-inch-wide sheet of WeatherLock down the middle of the valley, extending 18 inches on each side.
- Start at the low point of the valley and work upward.
- Press the membrane firmly into the valley center crease first, then work outward to avoid bridging or leaving hollow gaps underneath. Bridging can cause the membrane to tear when shingles are nailed over it.
For more on managing granulated seams, consult the WeatherLock® Granulated Ice & Water Barrier Installation Instructions.
Key Precautions, Limitations, and Exposure Windows
While Owens Corning WeatherLock is incredibly resilient, it is not designed to act as a permanent roof. Understanding its limitations is critical to avoiding structural issues down the road.
- 30-Day Exposure Limit: WeatherLock products should not remain uncovered for more than 30 days. Prolonged exposure to sun, wind, and heat will cause UV degradation of the modified asphalt, which ruins the self-sealing properties and voids the manufacturer warranty. If your project is delayed, you must protect the membrane from extended UV exposure.
- Vapor Barrier Properties: Because WeatherLock is a 100% moisture and vapor barrier, it does not allow the roof deck to “breathe.” Do not use it over the entire roof unless the attic space is engineered with exceptional ventilation. Standard practice requires 1 square foot of net free ventilation area per 150 square feet of attic space, split evenly between soffit (intake) and ridge (exhaust) vents. If your attic is unventilated, trapping moisture under a full-roof vapor barrier will lead to mold, wood rot, and structural sagging.
- Substrate Restrictions: Do not apply WeatherLock directly to concrete, masonry, or gypsum board without a compatible primer. Never install it in contact with flexible PVC materials, as chemical plasticizers in the PVC will degrade the asphalt, turning it into a sticky, non-functional mess.

Frequently Asked Questions about WeatherLock Installation
What is the minimum roof slope for Owens Corning WeatherLock?
WeatherLock must be installed on roofs with a minimum slope of 2:12 (2 inches of vertical rise for every 12 inches of horizontal run). It is not rated for flat roofs or slopes below 2:12. For flat roofs, alternative low-slope waterproofing systems must be utilized.
How long can WeatherLock remain exposed to the sun?
It must be covered with finished roofing (like asphalt shingles) within 30 days of installation. If you need a temporary roof or longer exposure, look into specialized high-temperature underlayments like Grace Ice & Water Shield HT, which can withstand up to 120 days of exposure.
How far up the roof should the ice and water barrier extend?
It must extend from the lowest eave edge to a point at least 24 inches inside the exterior wall line of the building. This ensures that when ice dams form at the cold overhang, the backed-up water remains over a self-sealing membrane rather than bare wood deck.
Can I use staples to temporarily secure WeatherLock?
No. Staples tear the membrane and do not provide a proper seal. The membrane is designed to adhere directly to the deck via its self-adhesive backing. If temporary fastening is required on steep slopes before the adhesive fully bonds, use only approved plastic cap nails, and place them only in areas that will be overlapped by the next course.
Is a primer required for OSB decks?
Generally, no primer is required if the OSB deck is clean, dry, and temperatures are above 40°F. However, if you are installing in cold weather (below 40°F) or on weathered, dusty OSB, applying an asphalt-based primer (ASTM D41) is highly recommended to ensure a secure bond.
Secure Your Home with Central Alabama’s Roofing Experts
A roof is only as good as the underlayment protecting its valleys, eaves, and penetrations. While owens corning ice and water shield installation is straightforward in theory, executing it flawlessly around valleys, chimneys, and steep slopes requires professional precision.
At Prime Roofing & Restoration, we provide licensed, insured, and expert roofing services across Alabaster, AL, Hoover, AL, and the surrounding Central Alabama areas. Whether you are dealing with storm damage, filing an insurance claim, or upgrading your home with a complete roof replacement, we use premium materials like Owens Corning WeatherLock to build roofs that protect your family for decades.
Contact Prime Roofing & Restoration
We are committed to delivering exceptional craftsmanship and transparent communication. Contact us today to schedule your professional roof inspection or to get a detailed estimate for your project.
- Company Name: Prime Roofing & Restoration
- Phone: (205) 225-4673
- Service Areas: Alabaster, AL | Hoover, AL | Birmingham Metro Area
If you are looking for reliable roofers in Alabaster, AL or need a professional roof inspection in Hoover, we are here to help.
Visit us online to schedule your free estimate!